Are you looking for a way to show off your unique style and personality? If so, laptop stickers are the perfect solution! With laptop stickers, you can customise your device with a logo, fun designs, meaningful quotes, and almost anything else you can imagine. They add a layer of personalisation to your computer or laptop and are also easy and inexpensive to make.
So if you’d like to learn how to design custom laptop stickers, read on! Here is a step-by-step guide that will help you create one-of-a-kind pieces of art that express who you are.
Think about what type of sticker you want
When it comes to designing laptop stickers, it is essential to take the time to think about what type of stickers you want before you start the design process. This will help ensure that your end product reflects your style and personality meaningfully.
Ordering custom stickers means you not only get to create your own design, but you can also pick:
- The material your stickers are printed on
- The shape of your stickers
- The size of your stickers
- The number of stickers you need
Consider these elements when you brainstorm your design to narrow down your options and ensure that everything fits together harmoniously. Thinking ahead can save a lot of headaches down the road!
Create a design or start browsing
Once you know what kind of sticker you’d like to make, it’s time to get creative! Whether starting from scratch with your artwork or browsing through pre-made templates and graphics online, having a finished concept ready to go when you start is vital.
Of course, this doesn’t need to be polished - you can always make adjustments and tweaks as you go along if needed. But having something to work on from the beginning will help you keep your vision on track throughout the design process.
If you are not well-versed in design programs such as Adobe Illustrator or Photoshop, you can use platforms like Canva to edit pre-made designs. You can also find some amazing to-good-to-be-free online sources:
- VectorStock - Half a million free vectors available for download
- flaticon - Thousands of suitable icons for free
- dafont or Google Fonts - Access to plenty of fonts
- Burst by Shopify - Photos free to use commercially
Or, if you want to turn an image into a sticker instead, read our article: how to turn pictures into laptop stickers.
Arrange your artwork
If you submit more than one design or a sheet of different designs, think about how you want to arrange them.
Getting a sheet with loads of designs is a great way to save money and create a fabulous aesthetic for your laptop. This is also an excellent chance to test how your designs fit together.
To start with, create a rectangular shape in the size of your overall sheet.
Then, place your designs onto that sheet. Each design should be 4mm apart from the next and at least 2cm tall/long/wide.
Add a custom cutline
Once you’ve decided on the placement of all your elements, you can add a custom cutline.
A cutline marks the edge of your laptop stickers. It will not be printed but will guide the cutting machine and create your desired custom shape.
There are two types of cutlines: A thru cut, which cuts through the material and the backing paper, and a kiss cut, which only cuts through the material layer (ideal for sheets).
You can find detailed step-by-step instructions in the below video:
Please remember that you do not have to add a cutline yourself. We can do that for you after you upload your design. A magenta line on your design proof will indicate the cutline. This line will not be printed.
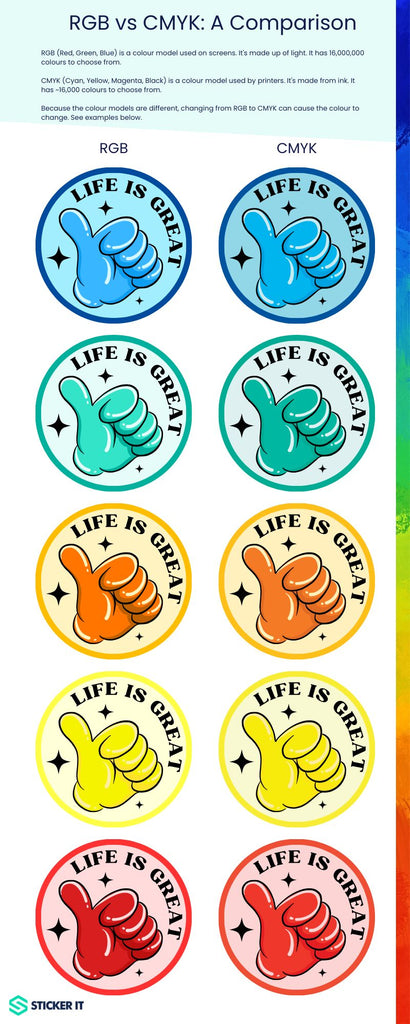
Set your colours to CMYK
Did you know that the colours you see on your screen differ from those that can be printed?
Your screen operates in an RGB colour gamut. RGB stands for red, green and blue. These colours are used to create 16,777,216.
On the other hand, printers use cyan, magenta, yellow and black (CMYK) to generate 16,000 colours. Plenty, but as you can see, significantly less than RGB.
Now, what does this mean? It means your screen can show you colours that cannot be printed. Crucial for creating brand colours.
To avoid unwelcome surprises, set the colours in your design to CMYK before sending it to print. This will give you the most accurate representation of what your laptop stickers will look like when printed.
Convert your text to outlines
If you are using any font or text in your design, it’s important to remember to convert it to outlines before exporting your artwork.
There are thousands of fonts available online, and you cannot guarantee that your sticker printer of choice will have the same fonts installed as you. If they do not, your fonts can be manipulated or replaced when opening the document.
To avoid this, convert your fonts to outlines. This will turn them into geometrical shapes that third parties cannot edit and will preserve the look of your design.
Here is a video on how you can convert text into outlines quickly and easily:
Export your artwork as a vector
Finally, once you’ve finished perfecting your design, it’s time to export it as a vector file.
Other than images, which consist of pixels, vector artwork is comprised of geometric formulas.
This makes them the best choice for printing because these formulas contain all the information needed to reproduce your artwork accurately and in high resolution.
If you do not have vector artwork, submit your design in the highest possible resolution you can. Please remember that poor-quality artwork can lead to pixelated or blurry stickers.
So what are you waiting for? Start creating unique designs now and show off your creative side on your laptop! By following the steps outlined in this article, you can ensure that each sticker looks perfect when printed. Remember that if you need any help along the way, we are here for you! Our team of experts will be more than happy to assist with artwork conversions so don’t hesitate to reach out.